
Last year J and I made a climbing wall for cats a few months before our cats moved to us. In this article I’ll tell you why we made it, the pros compared to regular cat furniture, our shopping list and photos.
This article is originally posted in Dutch: ‘Klimmuur maken voor katten‘
We’ve been thinking about cat furniture for some time. As we were going for two kittens, but ended up getting three, we needed plenty of space. British Shorthair cats can also get quite big so it needs to be sturdy. Regular sturdy cat trees that you can buy at pet stores take up quite a lot of floor space. Our living room isn’t huge (around 35m2) so we didn’t want to use as much floor space as for example our dining table. So where and how were we able to create something for the cats?
Considerations cat tree
Of course there are smaller cat tree or different furniture options, but we wanted to give the cats not only high places to sleep but also lots of scratching and climbing options. If there are visitors we want them to be able to withdraw to a high spot, because cats like to literally look down on people 😀
There are also multiple tree constructions that go all the way to your ceiling which you clamp tight to make it stand stable. I don’t think it’s not the most beautiful solution and the last half meter is mostly wood. Instead of a spot to lie. There are also constructions that don’t go all the way to the ceiling. These are very wide to provide stability which makes it very visible in the room. Last but not least, it’s very difficult to find one that has enough sleeping places, sturdy enough and pretty to see – for us humans. Of course the joy and challenge for the cats is the most important thing, but if we are able to choose we prefer something that’s not that ugly 🙂
We wanted to provide a little more ‘tree’ experience
We have some friends that also have cats and cat trees. For quite a lot of models it’s difficult to climb from the bottom of the scratching post all the way to the top. It’s mostly climbing a bit, jumping on a shelf, climbing a bit, jumping on another shelf etc. We wanted to provide a little more ‘tree’ experience, where cats can run vertical for at least a few jumps. So we quickly decided not to buy a pre-made cat tree and save the money to make something ourselves.
DIY – Making a climbing wall
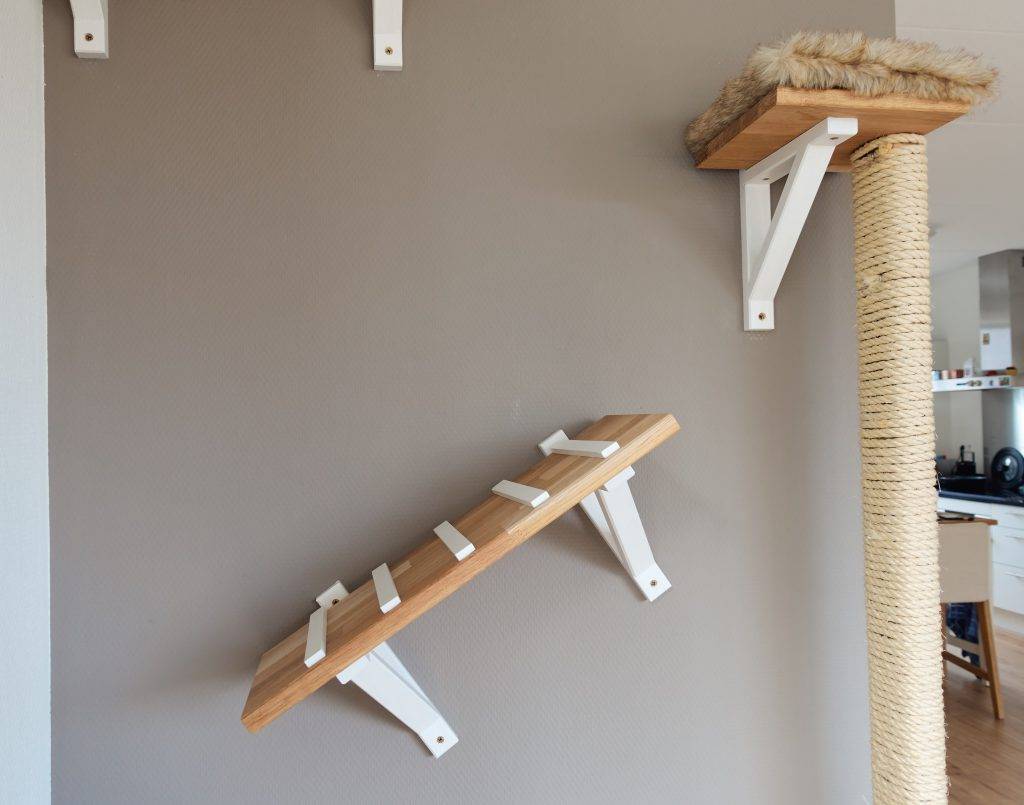
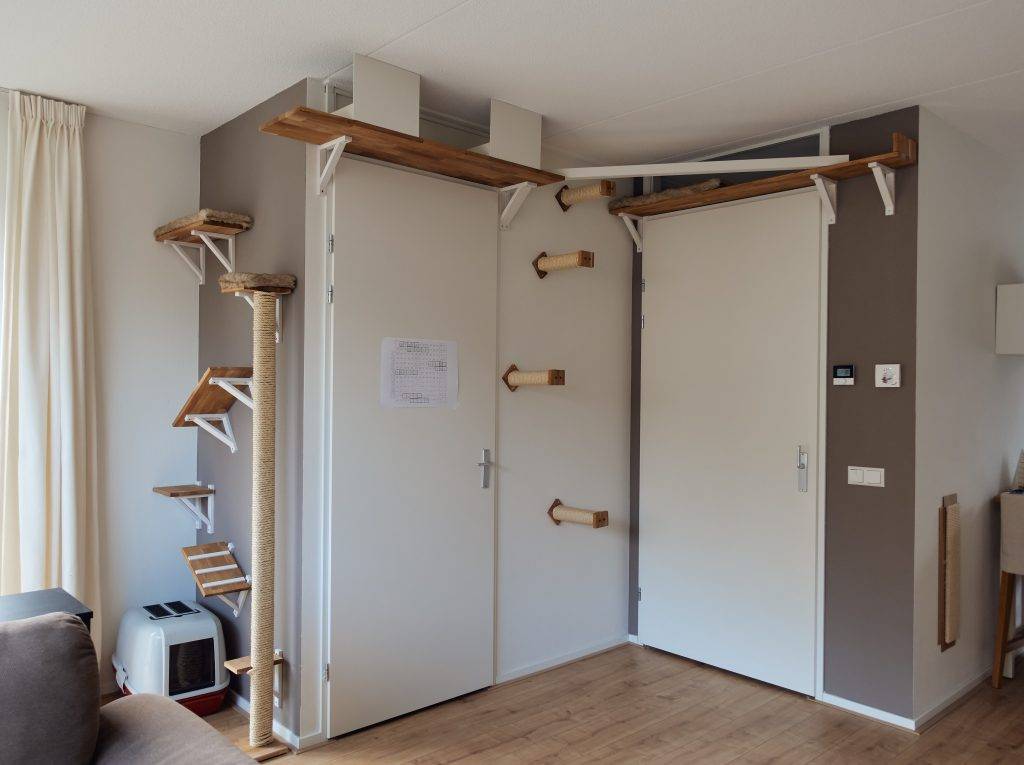
Where do you start when you want to make a climbing wall for cats? Looking at a lot of inspiration pictures of course 🙂 The most important issue we had to deal with was stability, considering that two or three very energetic and ‘big boned’ kittens had to be able to go in full crazy mode. It’s difficult to make something all the way up to the ceiling without going very wide. So we decided not to make a cat tree or furniture that is detached from everything. Instead we decided to make a cat wall because it gives more stability. Every part is mounted to the wall, in this case interior walls so drilling was easy – except from those damn electrical cables.
Making the actual wall took a few weeks because we had to wait a lot in between. A list of all the materials we’ve used with links to the Dutch shops:
- Ikea Ekby Valter, shelf carrier from untreated wood and able to carry 10kg per unit
- CanDo solid oak panel, used both 20cm and 30cm wide
- MDF plate
- White primer
- Flexa paint 9010 (matching interior)
- Sisal rope, 8mm thick
- Small Dunne latjes
- Screws, plugs
- Spruce planks
- Fabric and foam for the grip and sleeping places
We also bought tools we didn’t have before, like screwdriver/drill, wooden saw, paint brushes, digital detector and more.
Execution
Started with roughly drawing on the wall where which shelf or shelf carrier was supposed to go. We wanted to go only once to the Praxis, but of course you forget more than you think so we ended up going around 8 times 😀 We tried sawing the first solid wooden shelf ourselves by hand, but that was not a great idea. So all other shelves were cut with a machine in the Praxis, which they do for free as long as you tell them what sizes to cut. Definitely recommend that!
Once we knew where what was going we started by painting the shelf carriers white and oiling the shelves. Once everything was painted and cut (fast forward a couple of weeks because of layers and layers of paint), we put everything on the wall and marked where we had to drill. After readjusting and double and triple checking that there was no current or pipes on those spots we drilled all the holes.
Making all the pieces fit
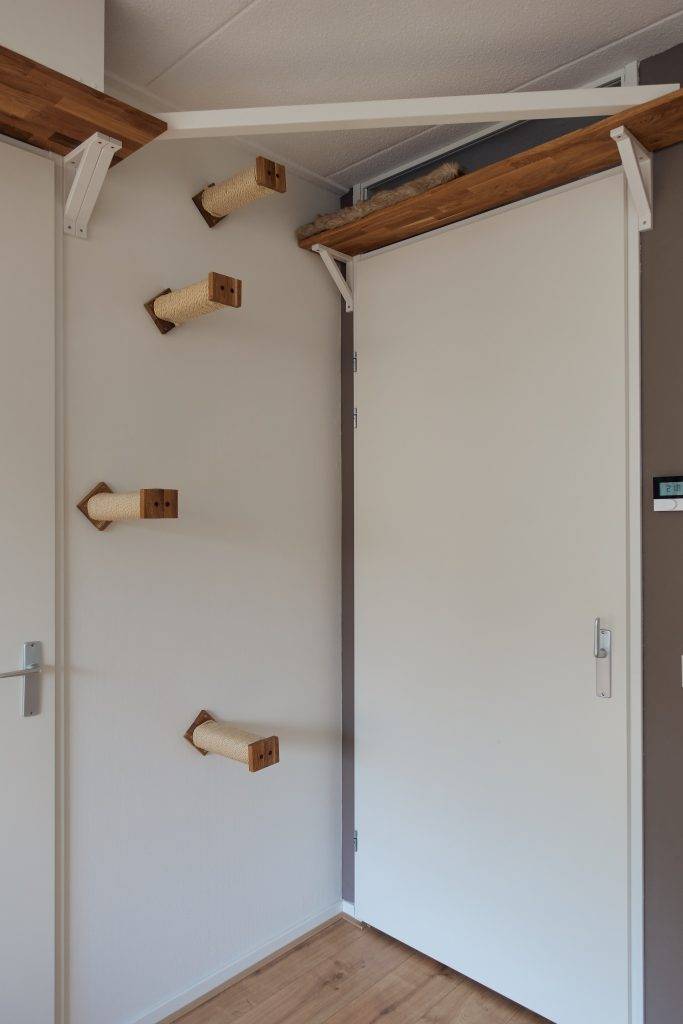
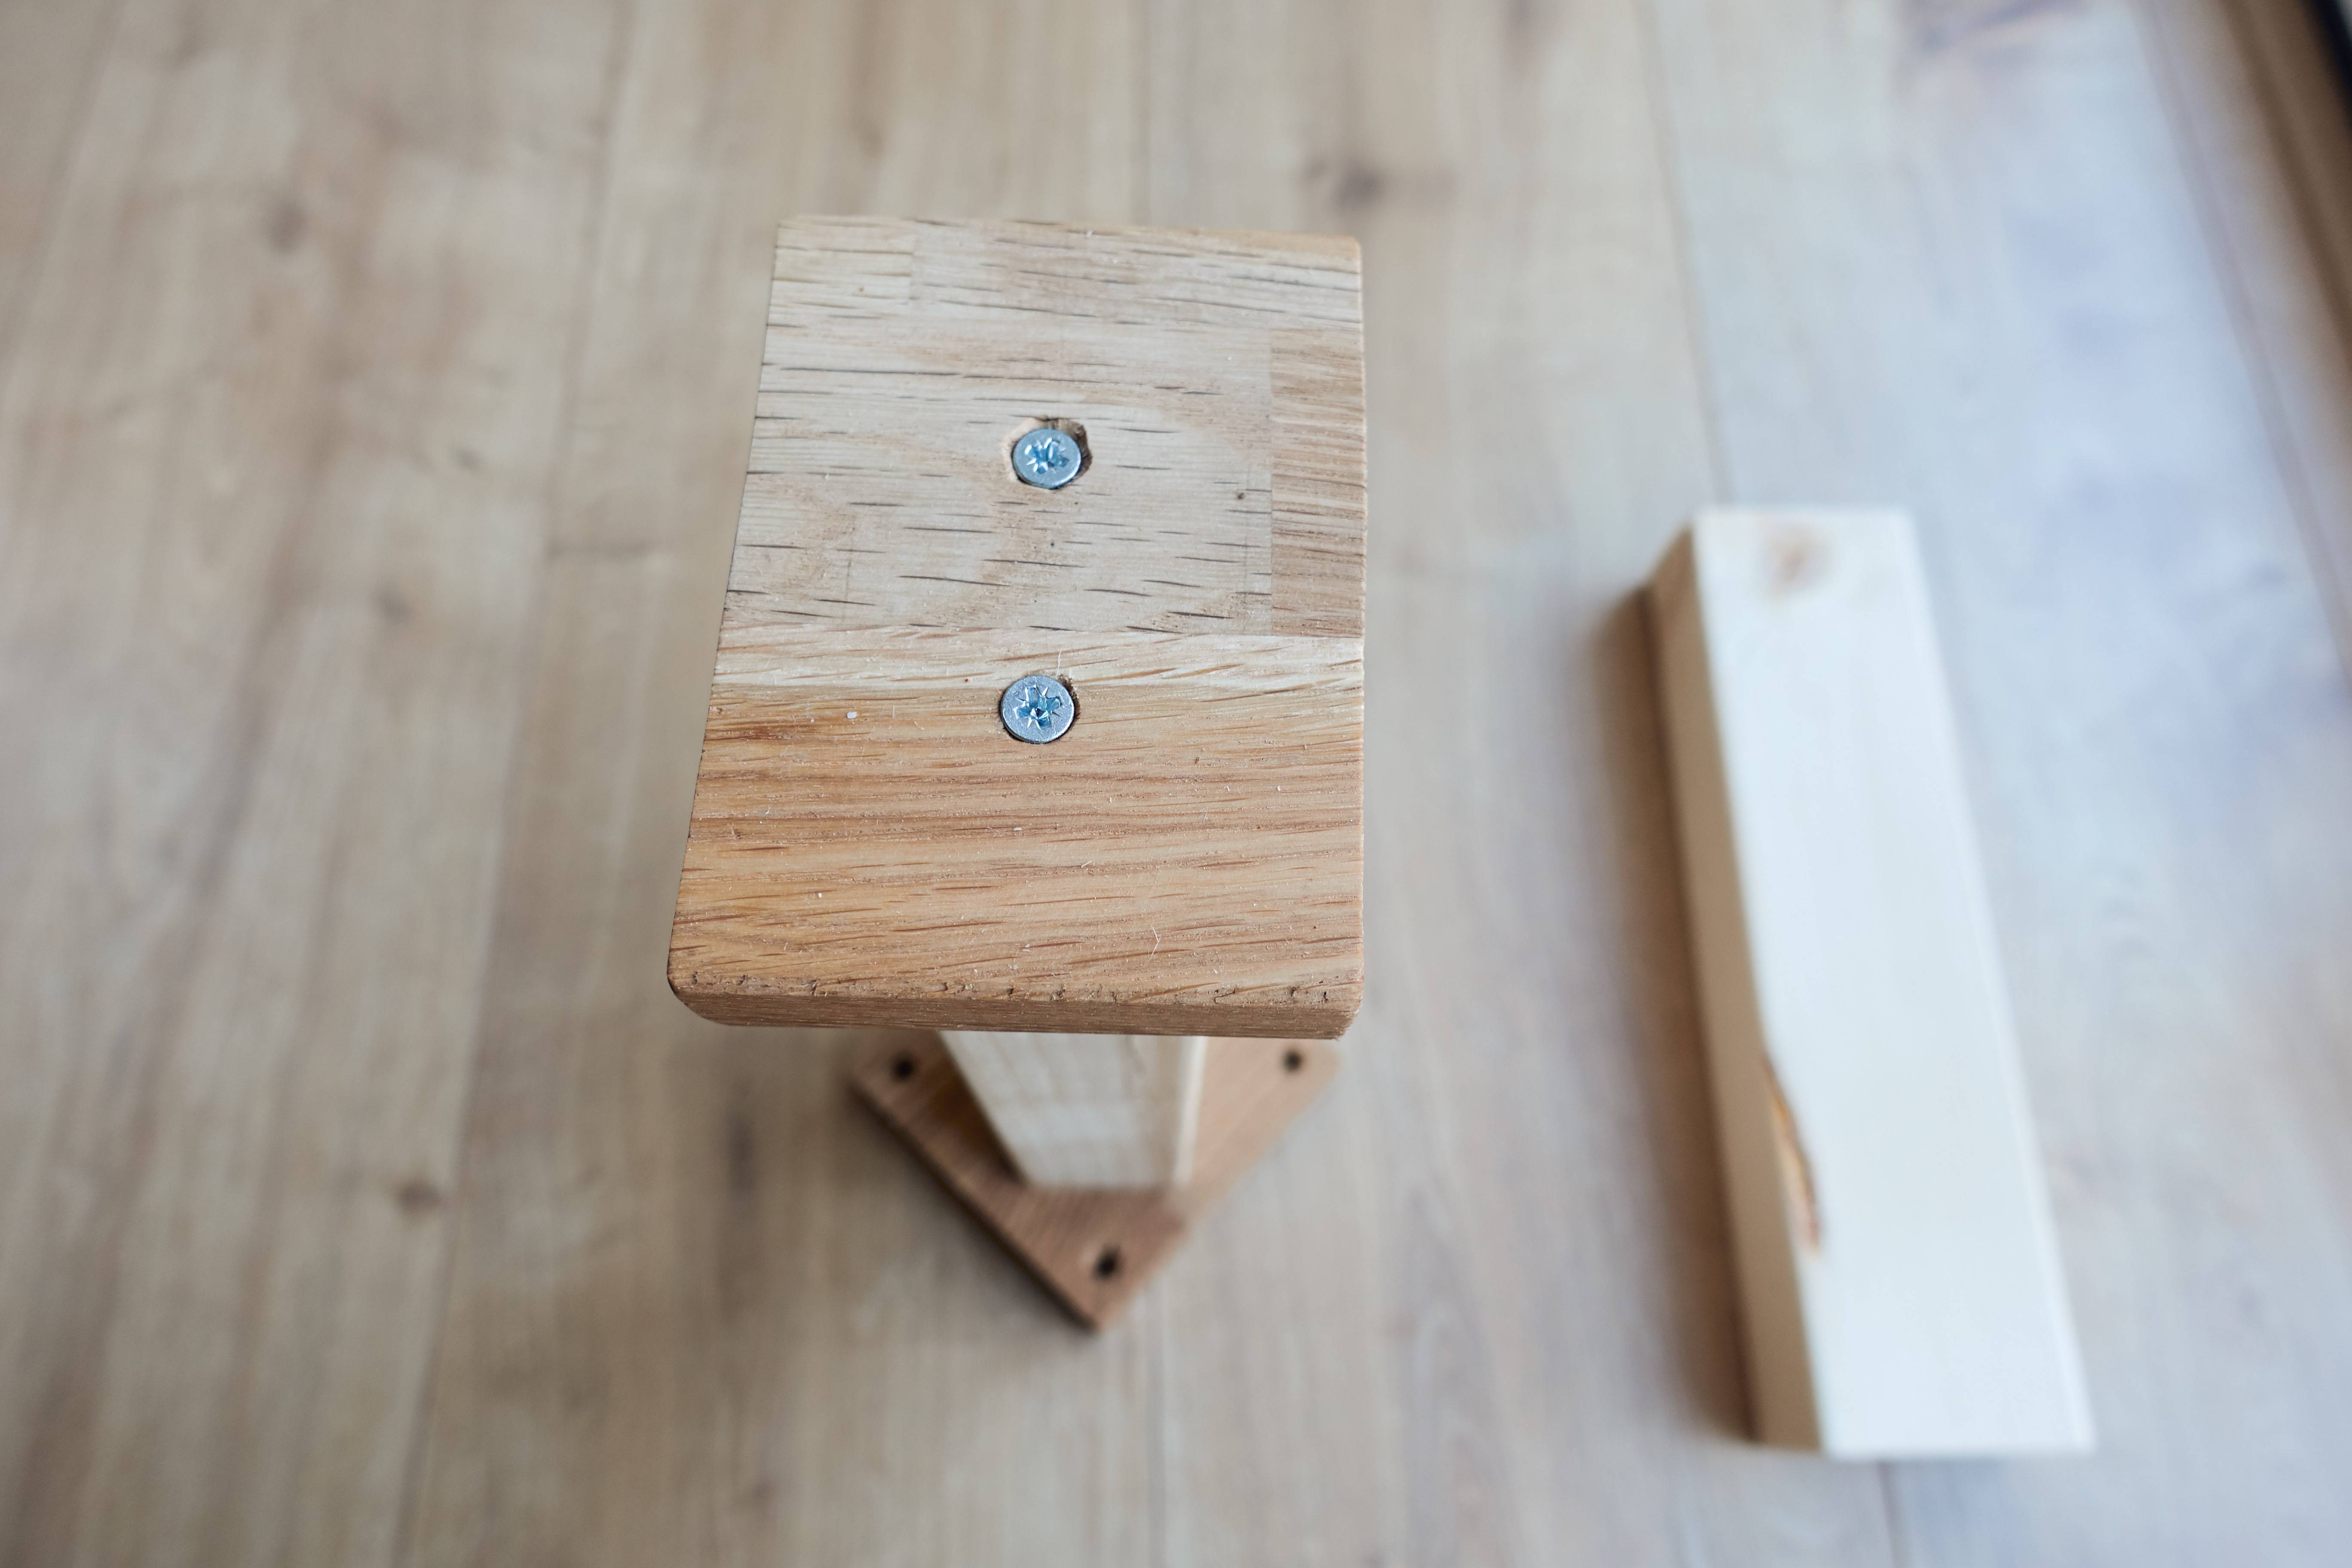
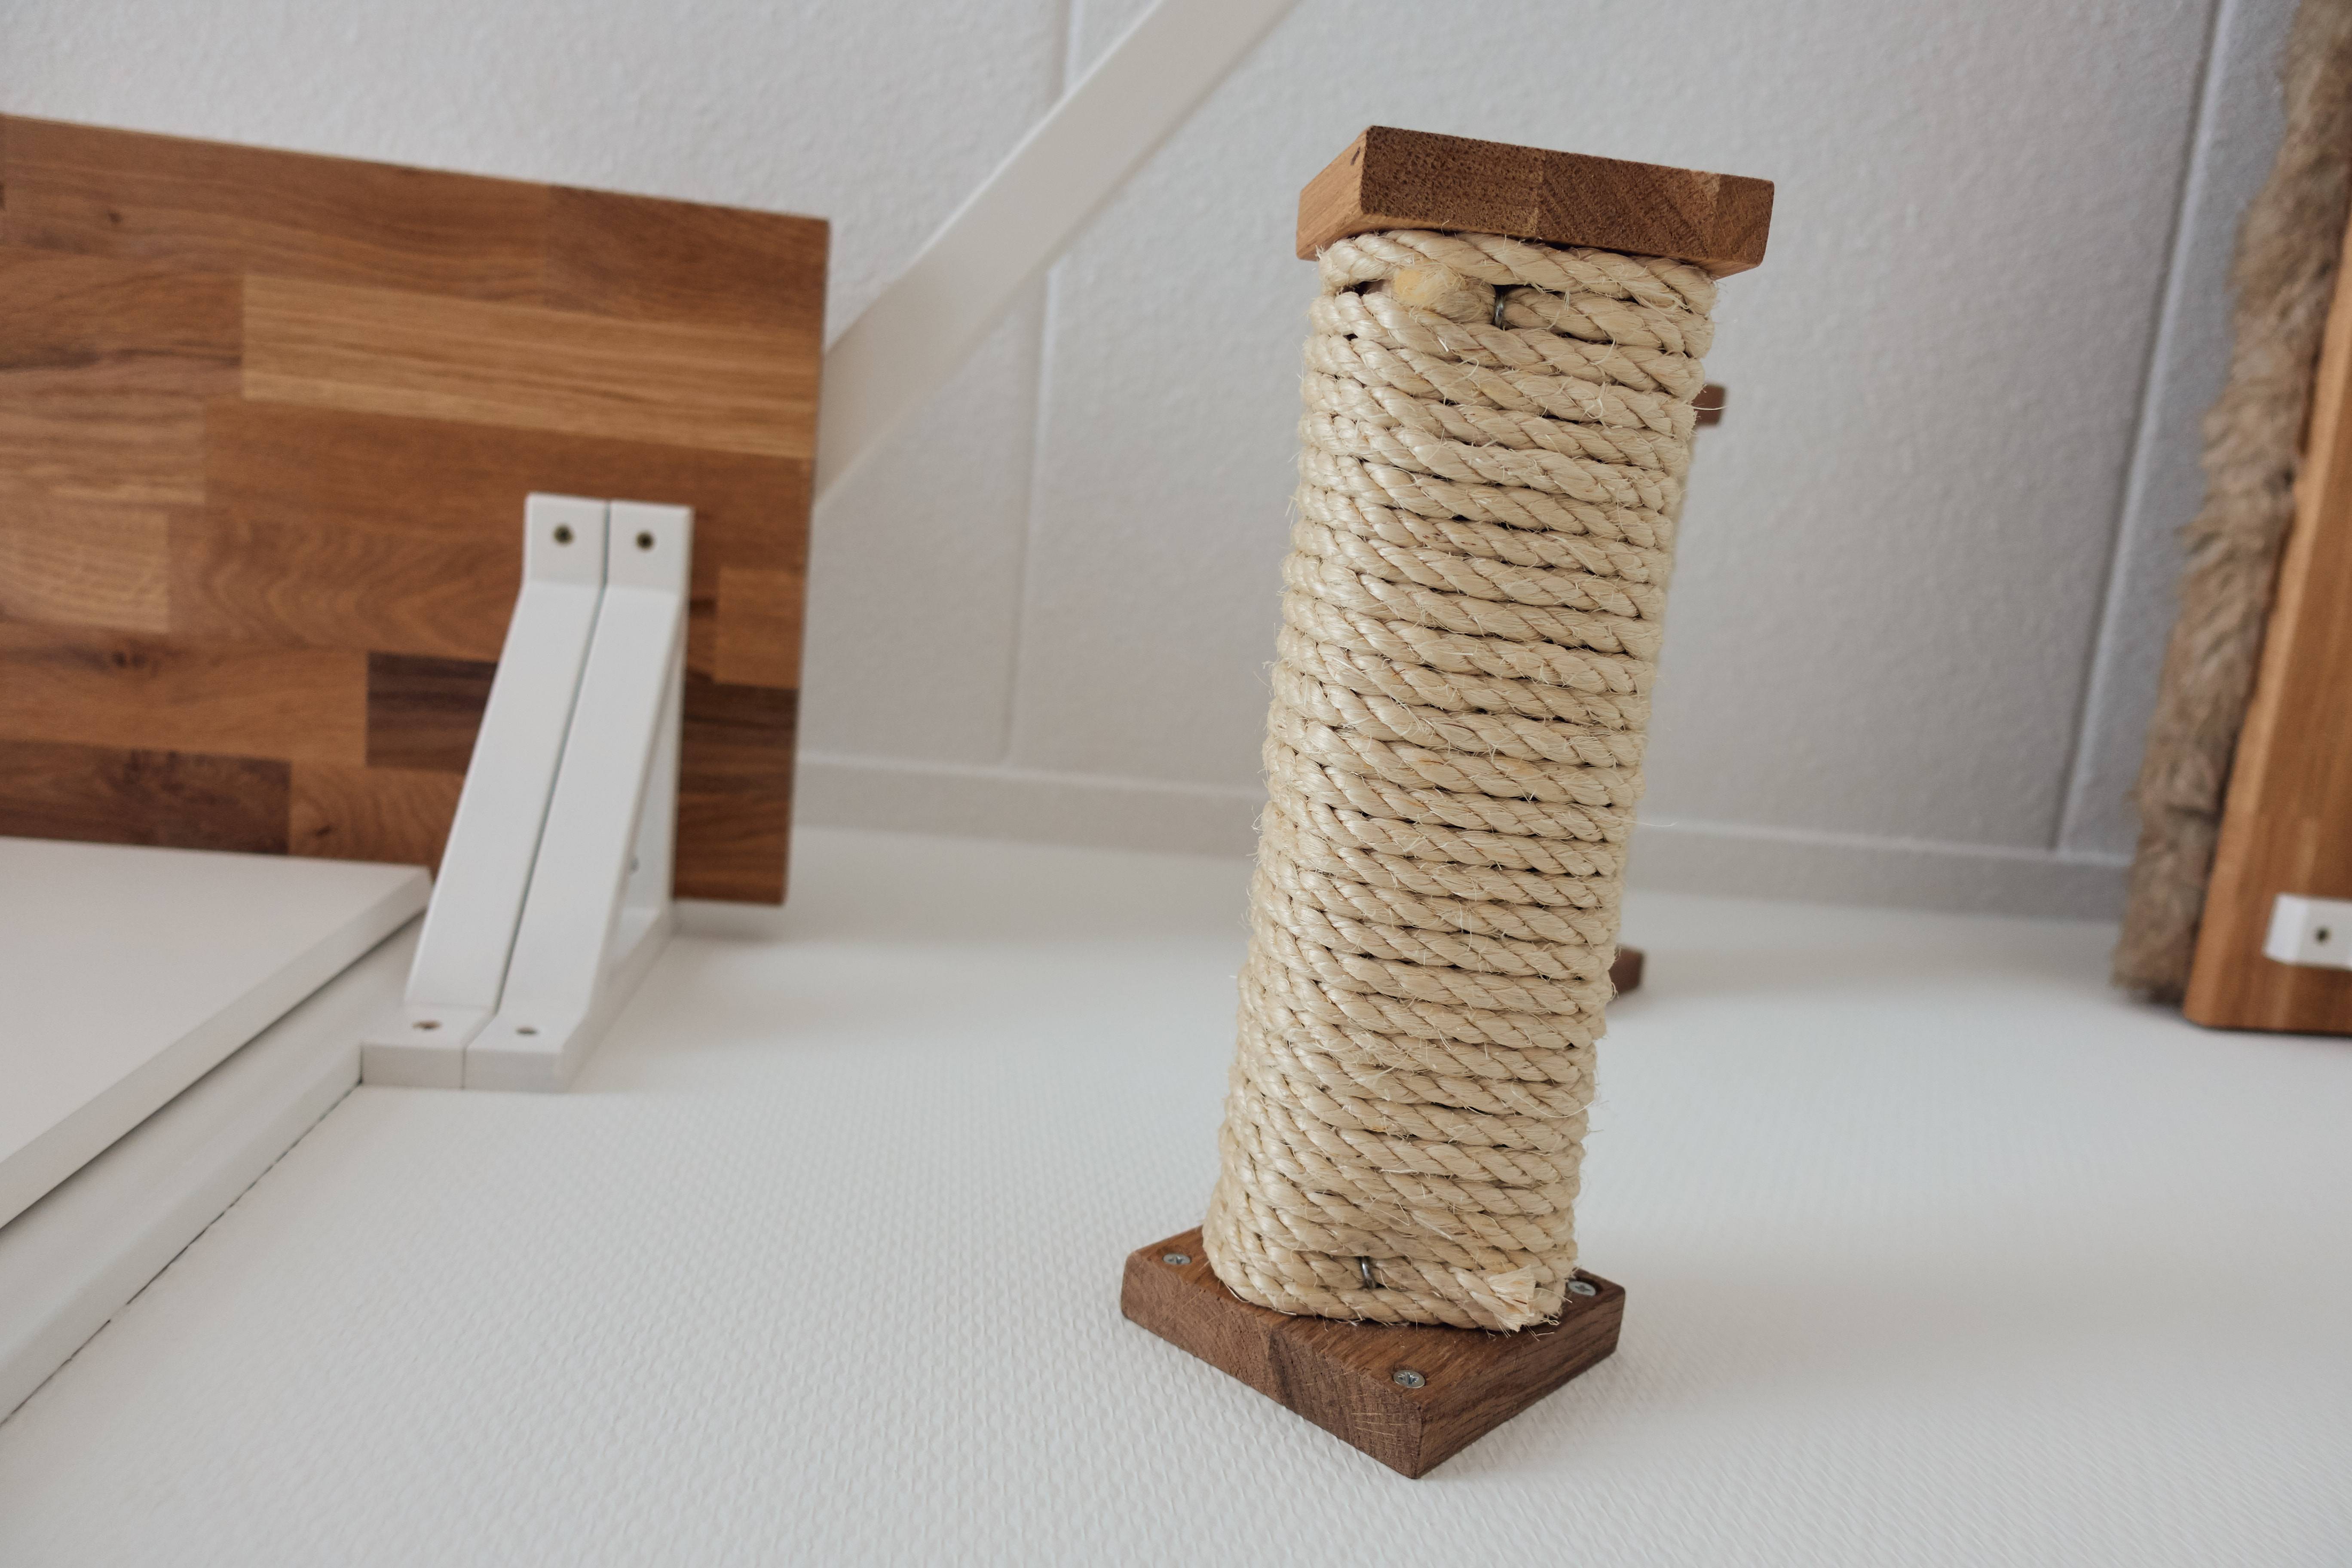
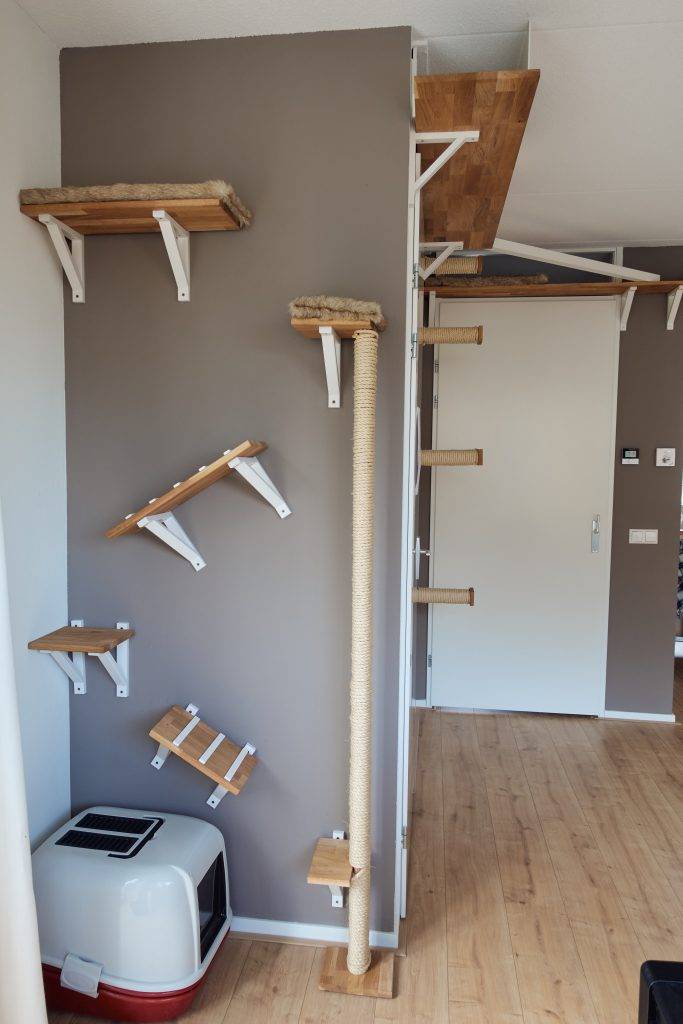
After the prep work the actual puzzle started. We had to mount the shelf carriers on the wall. Put the shelf on top of it, draw where the holes of the carrier aligned with the shelf. Remove everything from the wall and attach carrier to shelf. After successful doing that, we had to mount everything back on the wall. The climbing pole is completely wound with sisal, which also took quite some time. We attached the sisal to the wood with nails. Same for the small steps in between the doors. The climbing pole is 1.80m high so enough room to run up and down.
Last but not least we made the spots where the cats could relax and chill. Cut some foam to size and measured and cut a big hairy carpet. With a sowing machine I finished the fabric and attached some velcro. The velcro makes sure it can be firmly attached to the wood, which also has velcro nailed to it. But also remove the fabric from the foam, wash it or trow it away, and reuse the foam if we want some other fabric on it. Final touches were the small white steps which are glued to the wood.
Making the small sisal steps
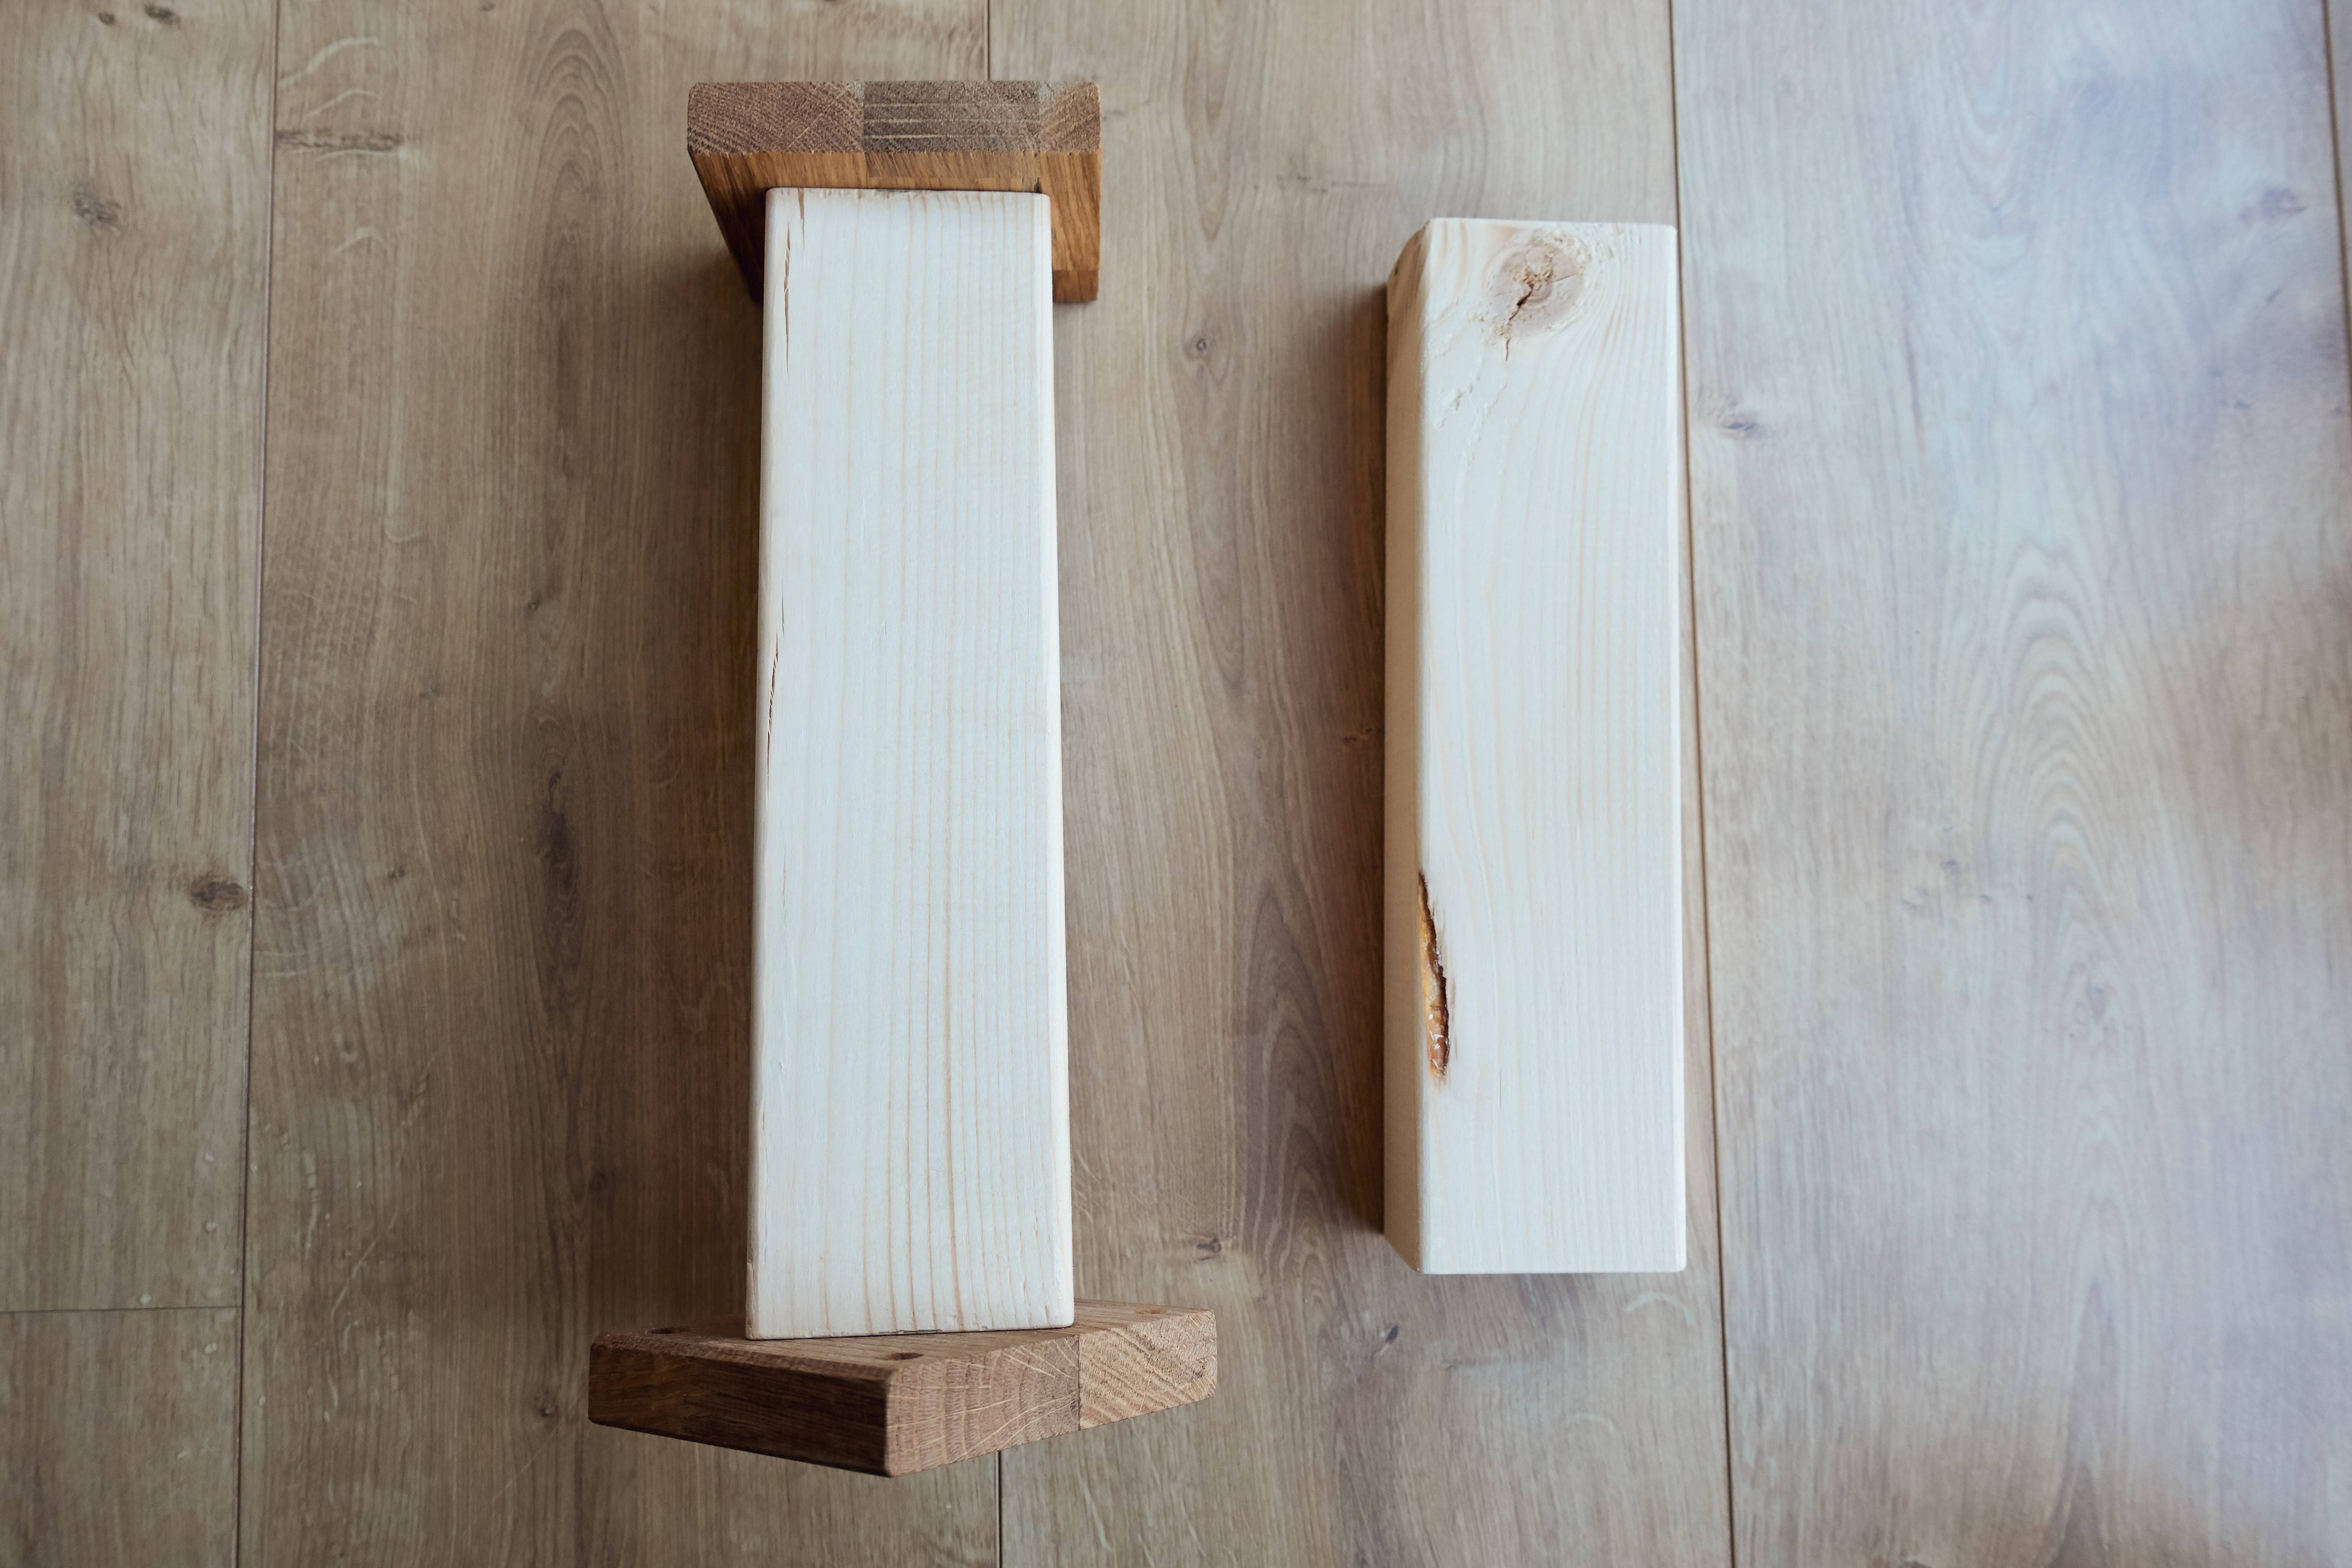
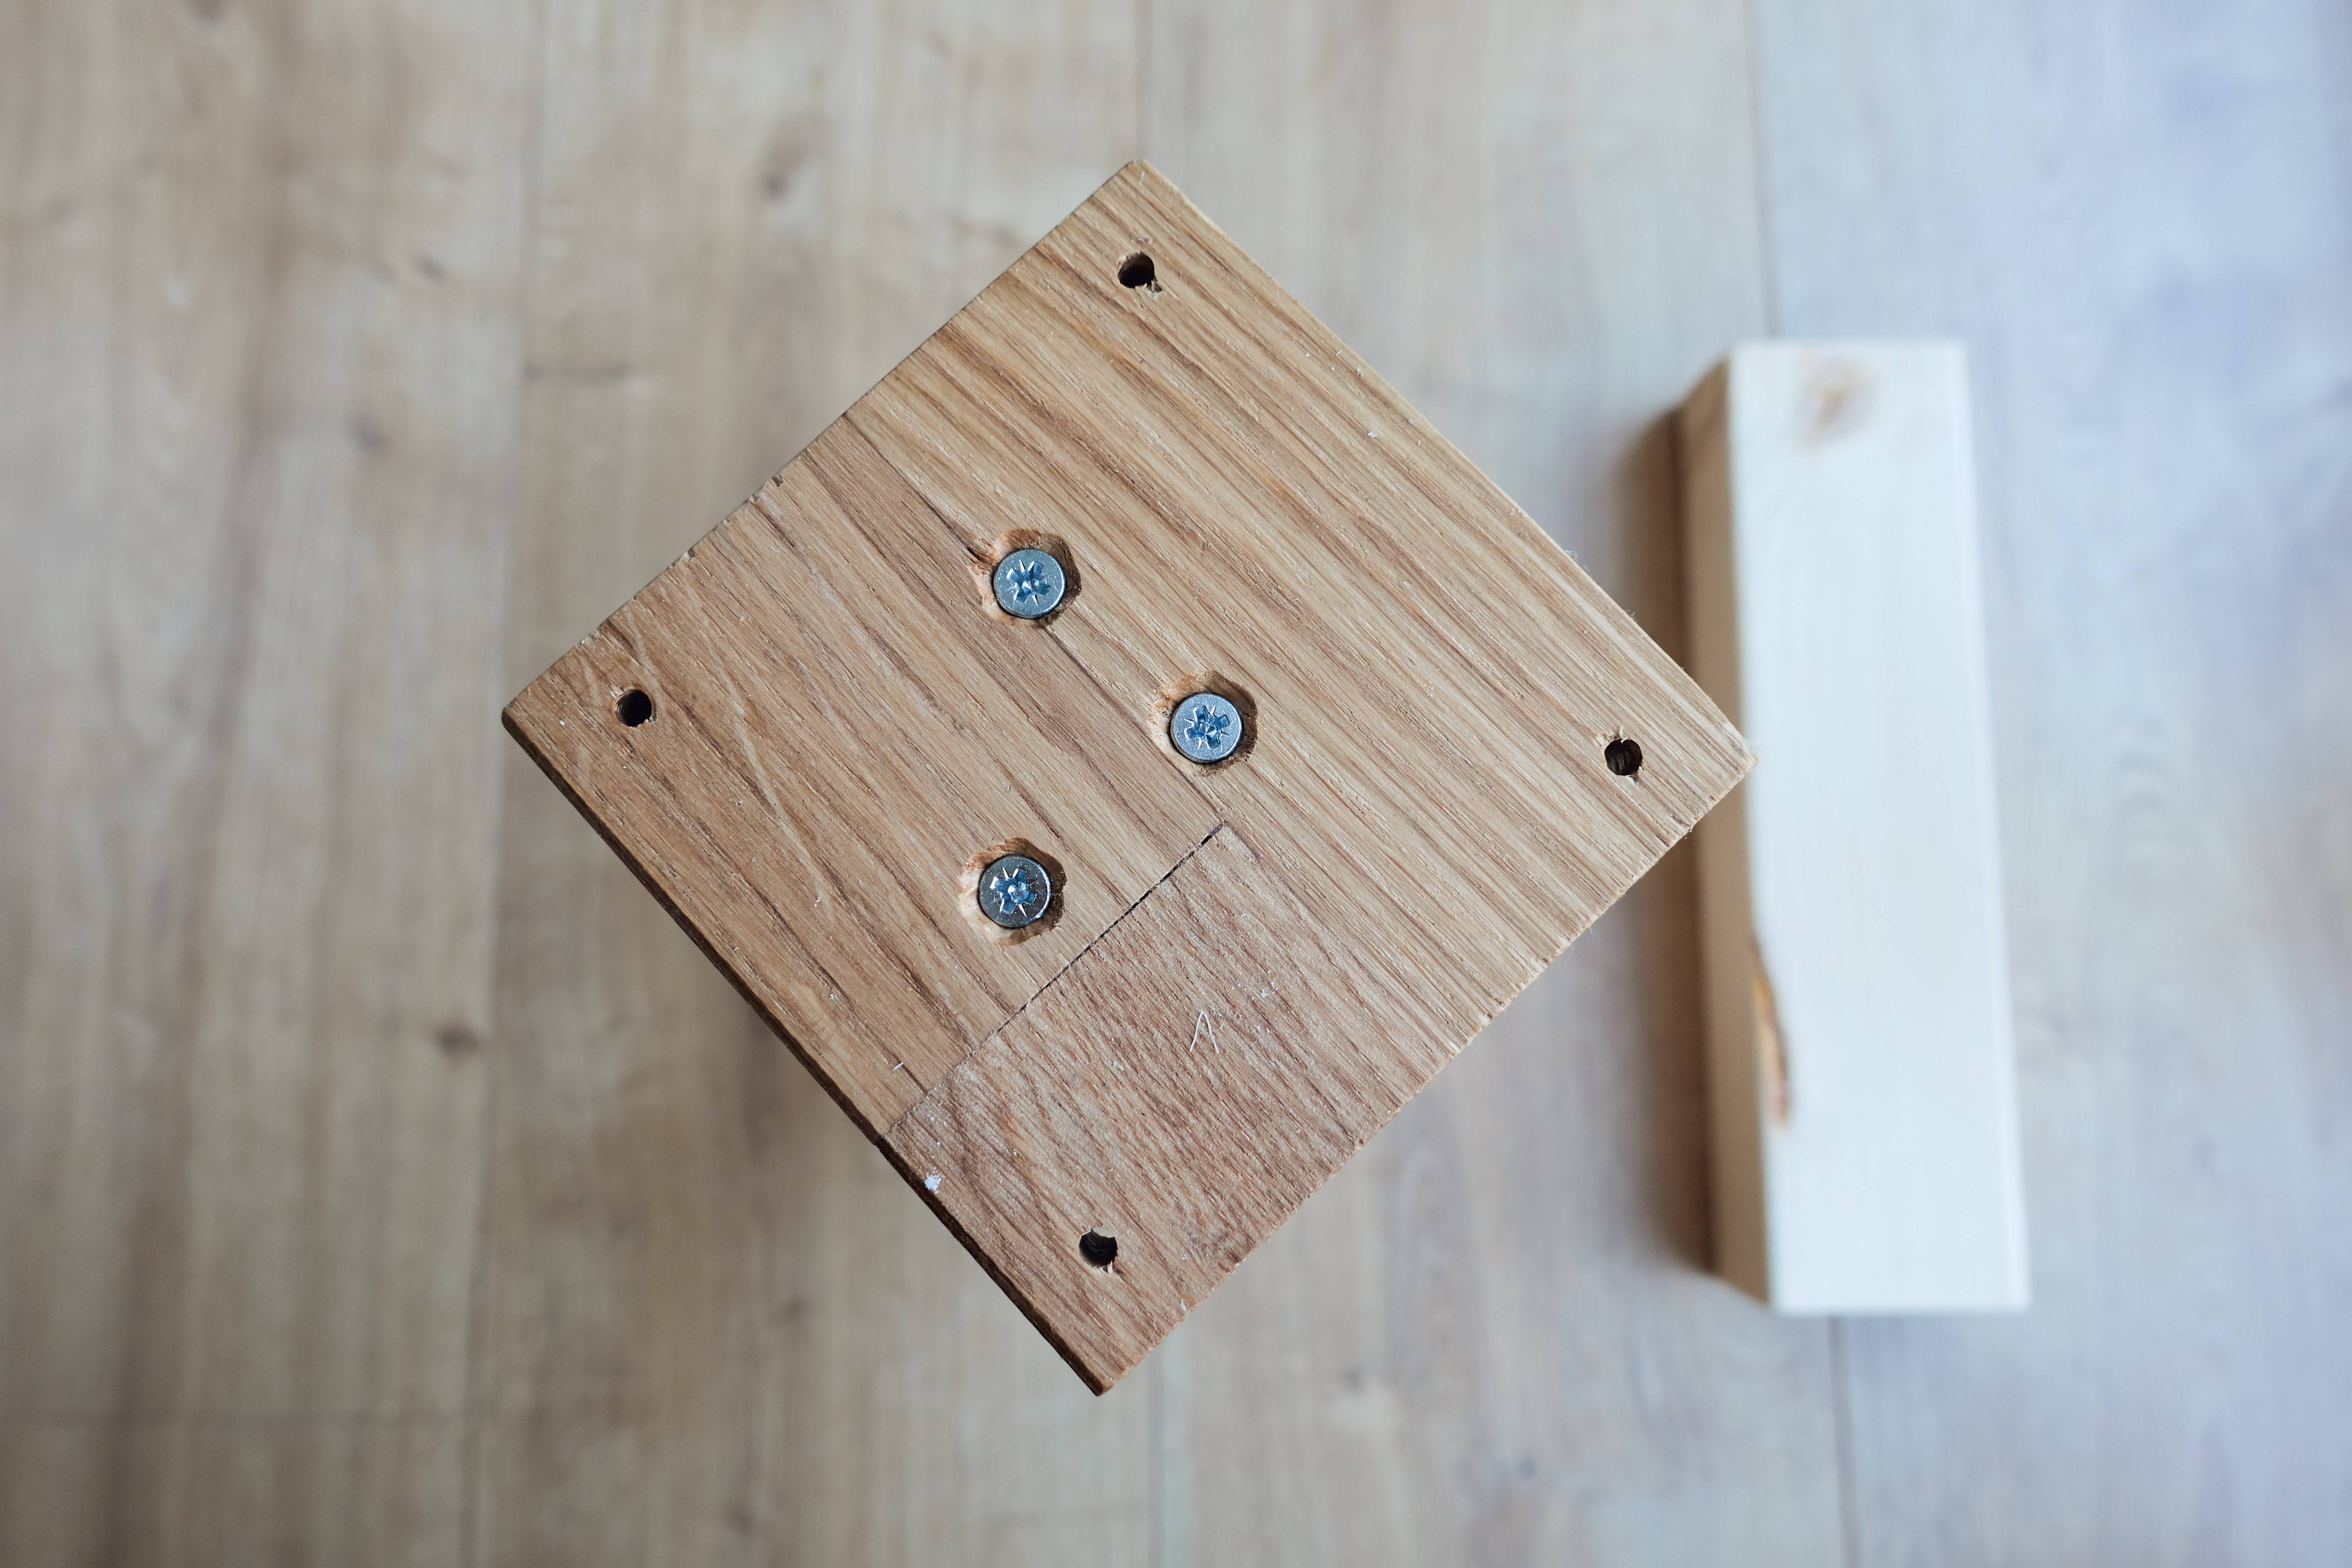
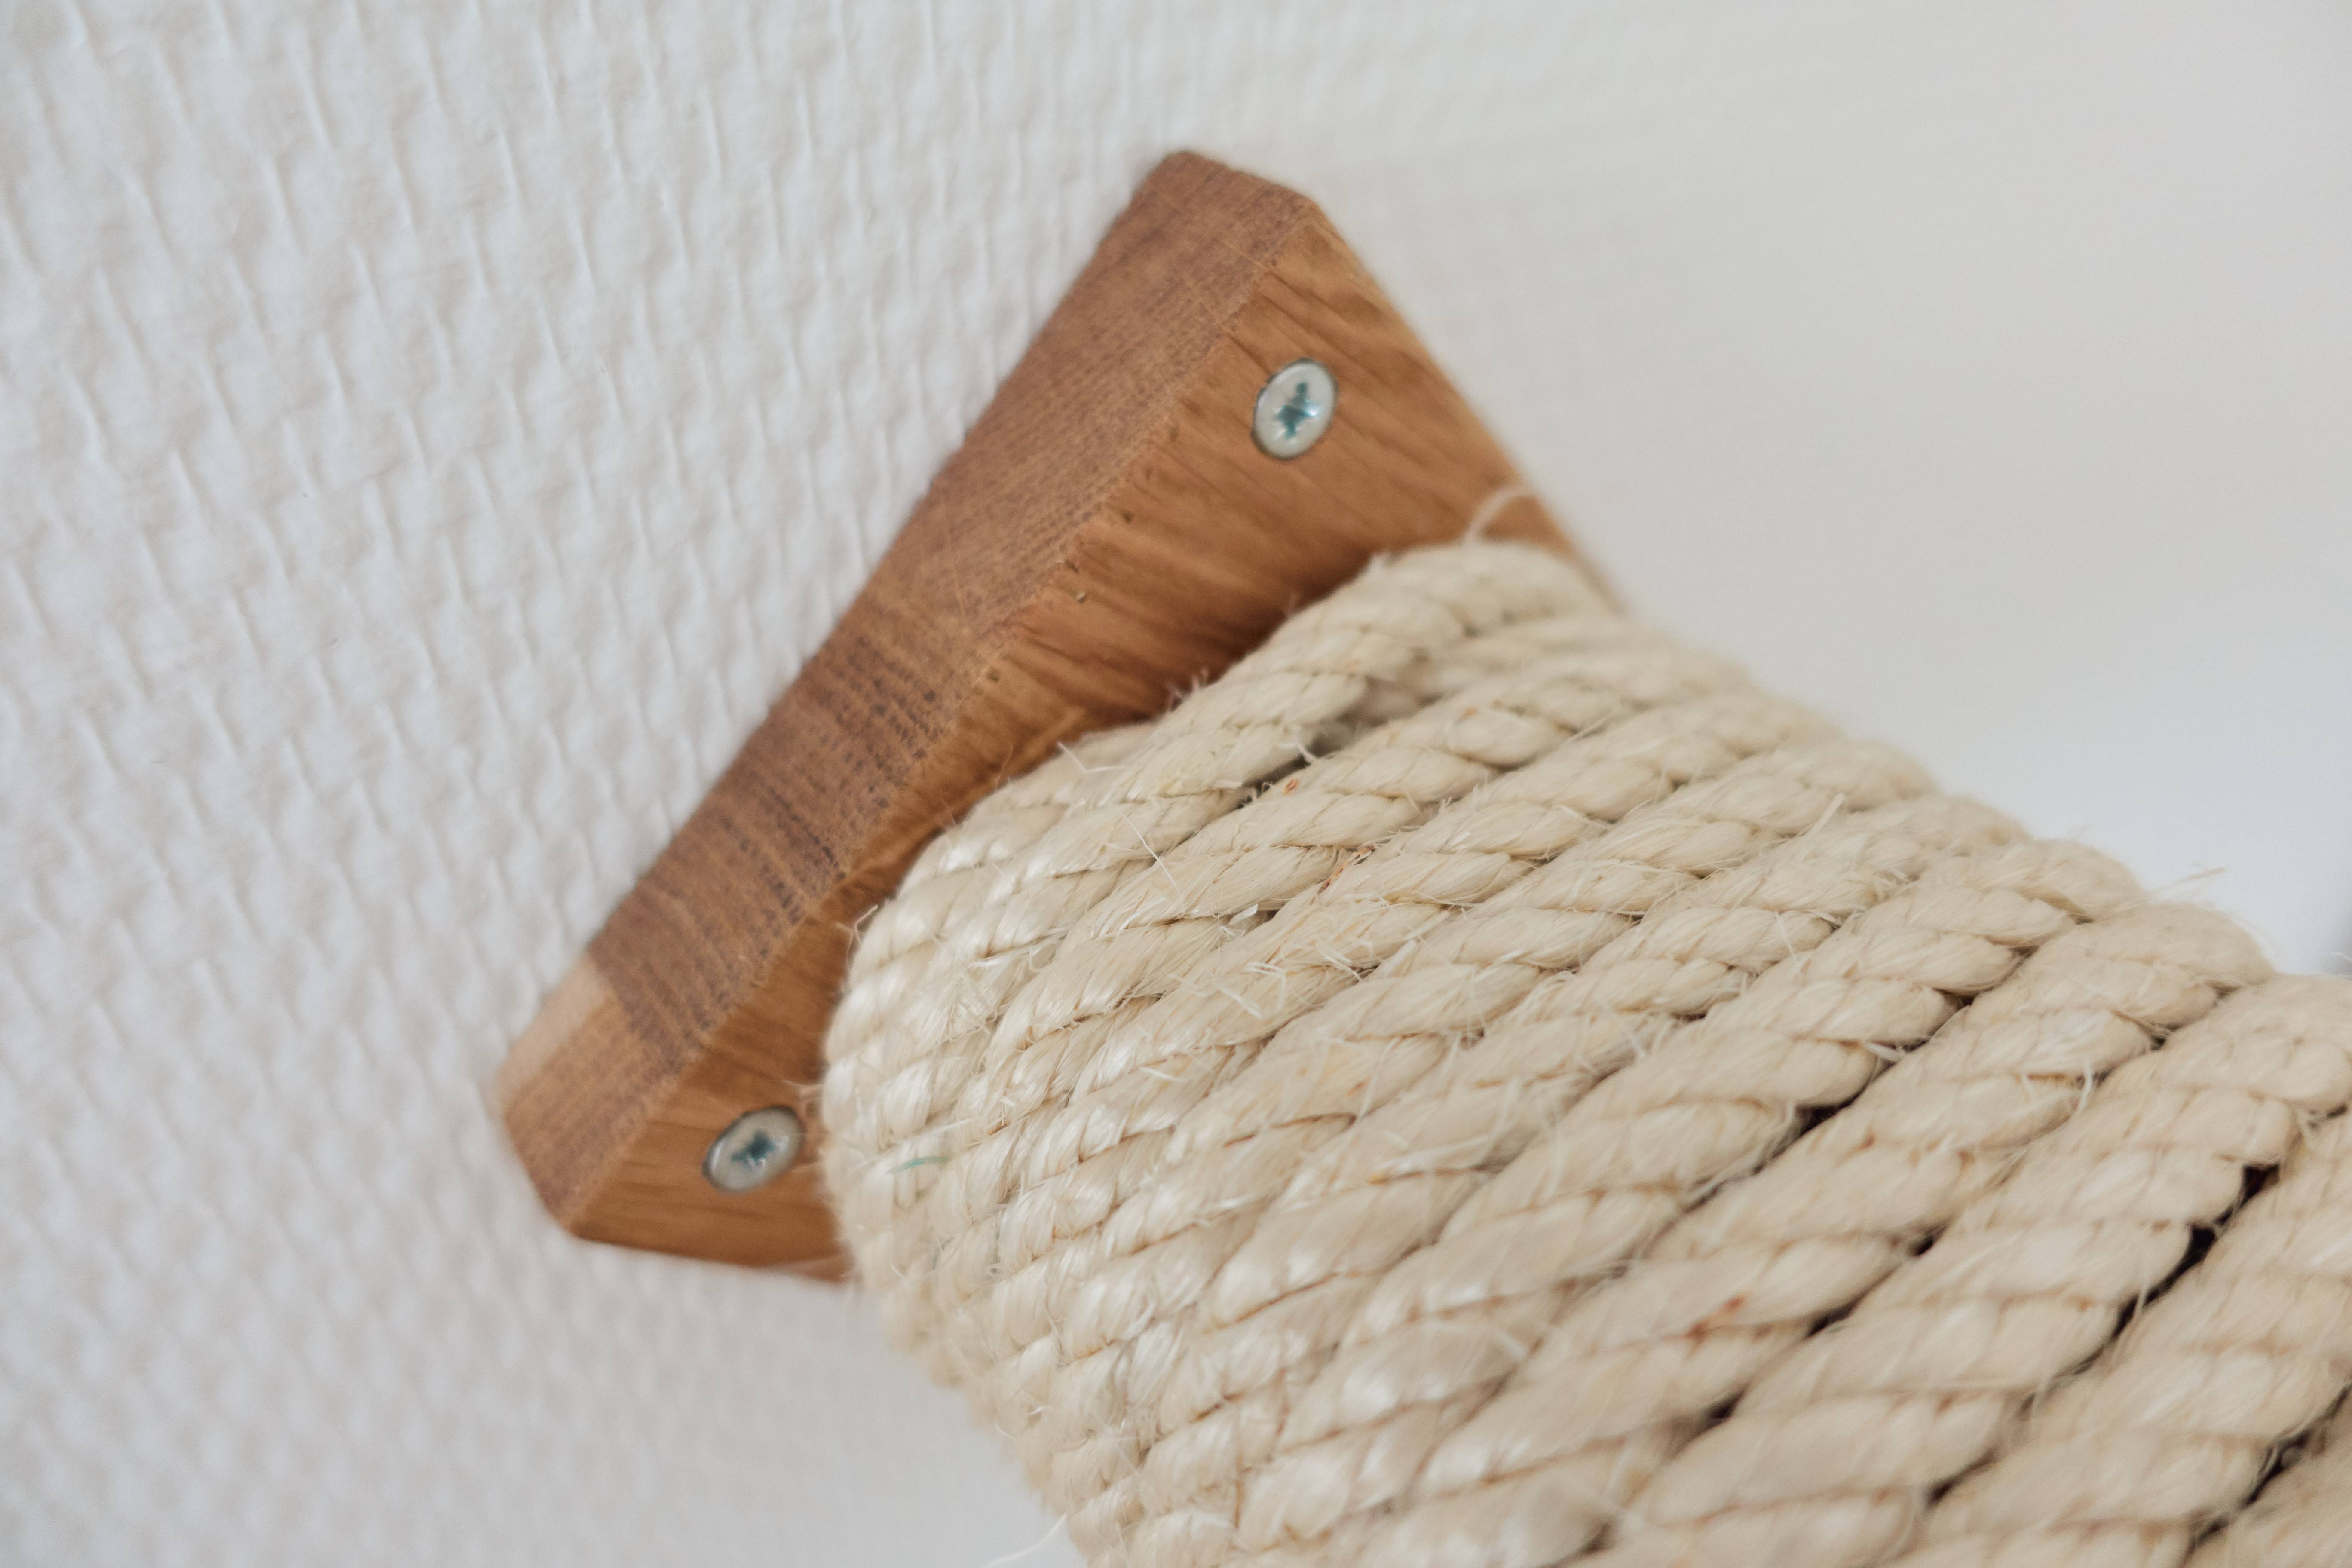
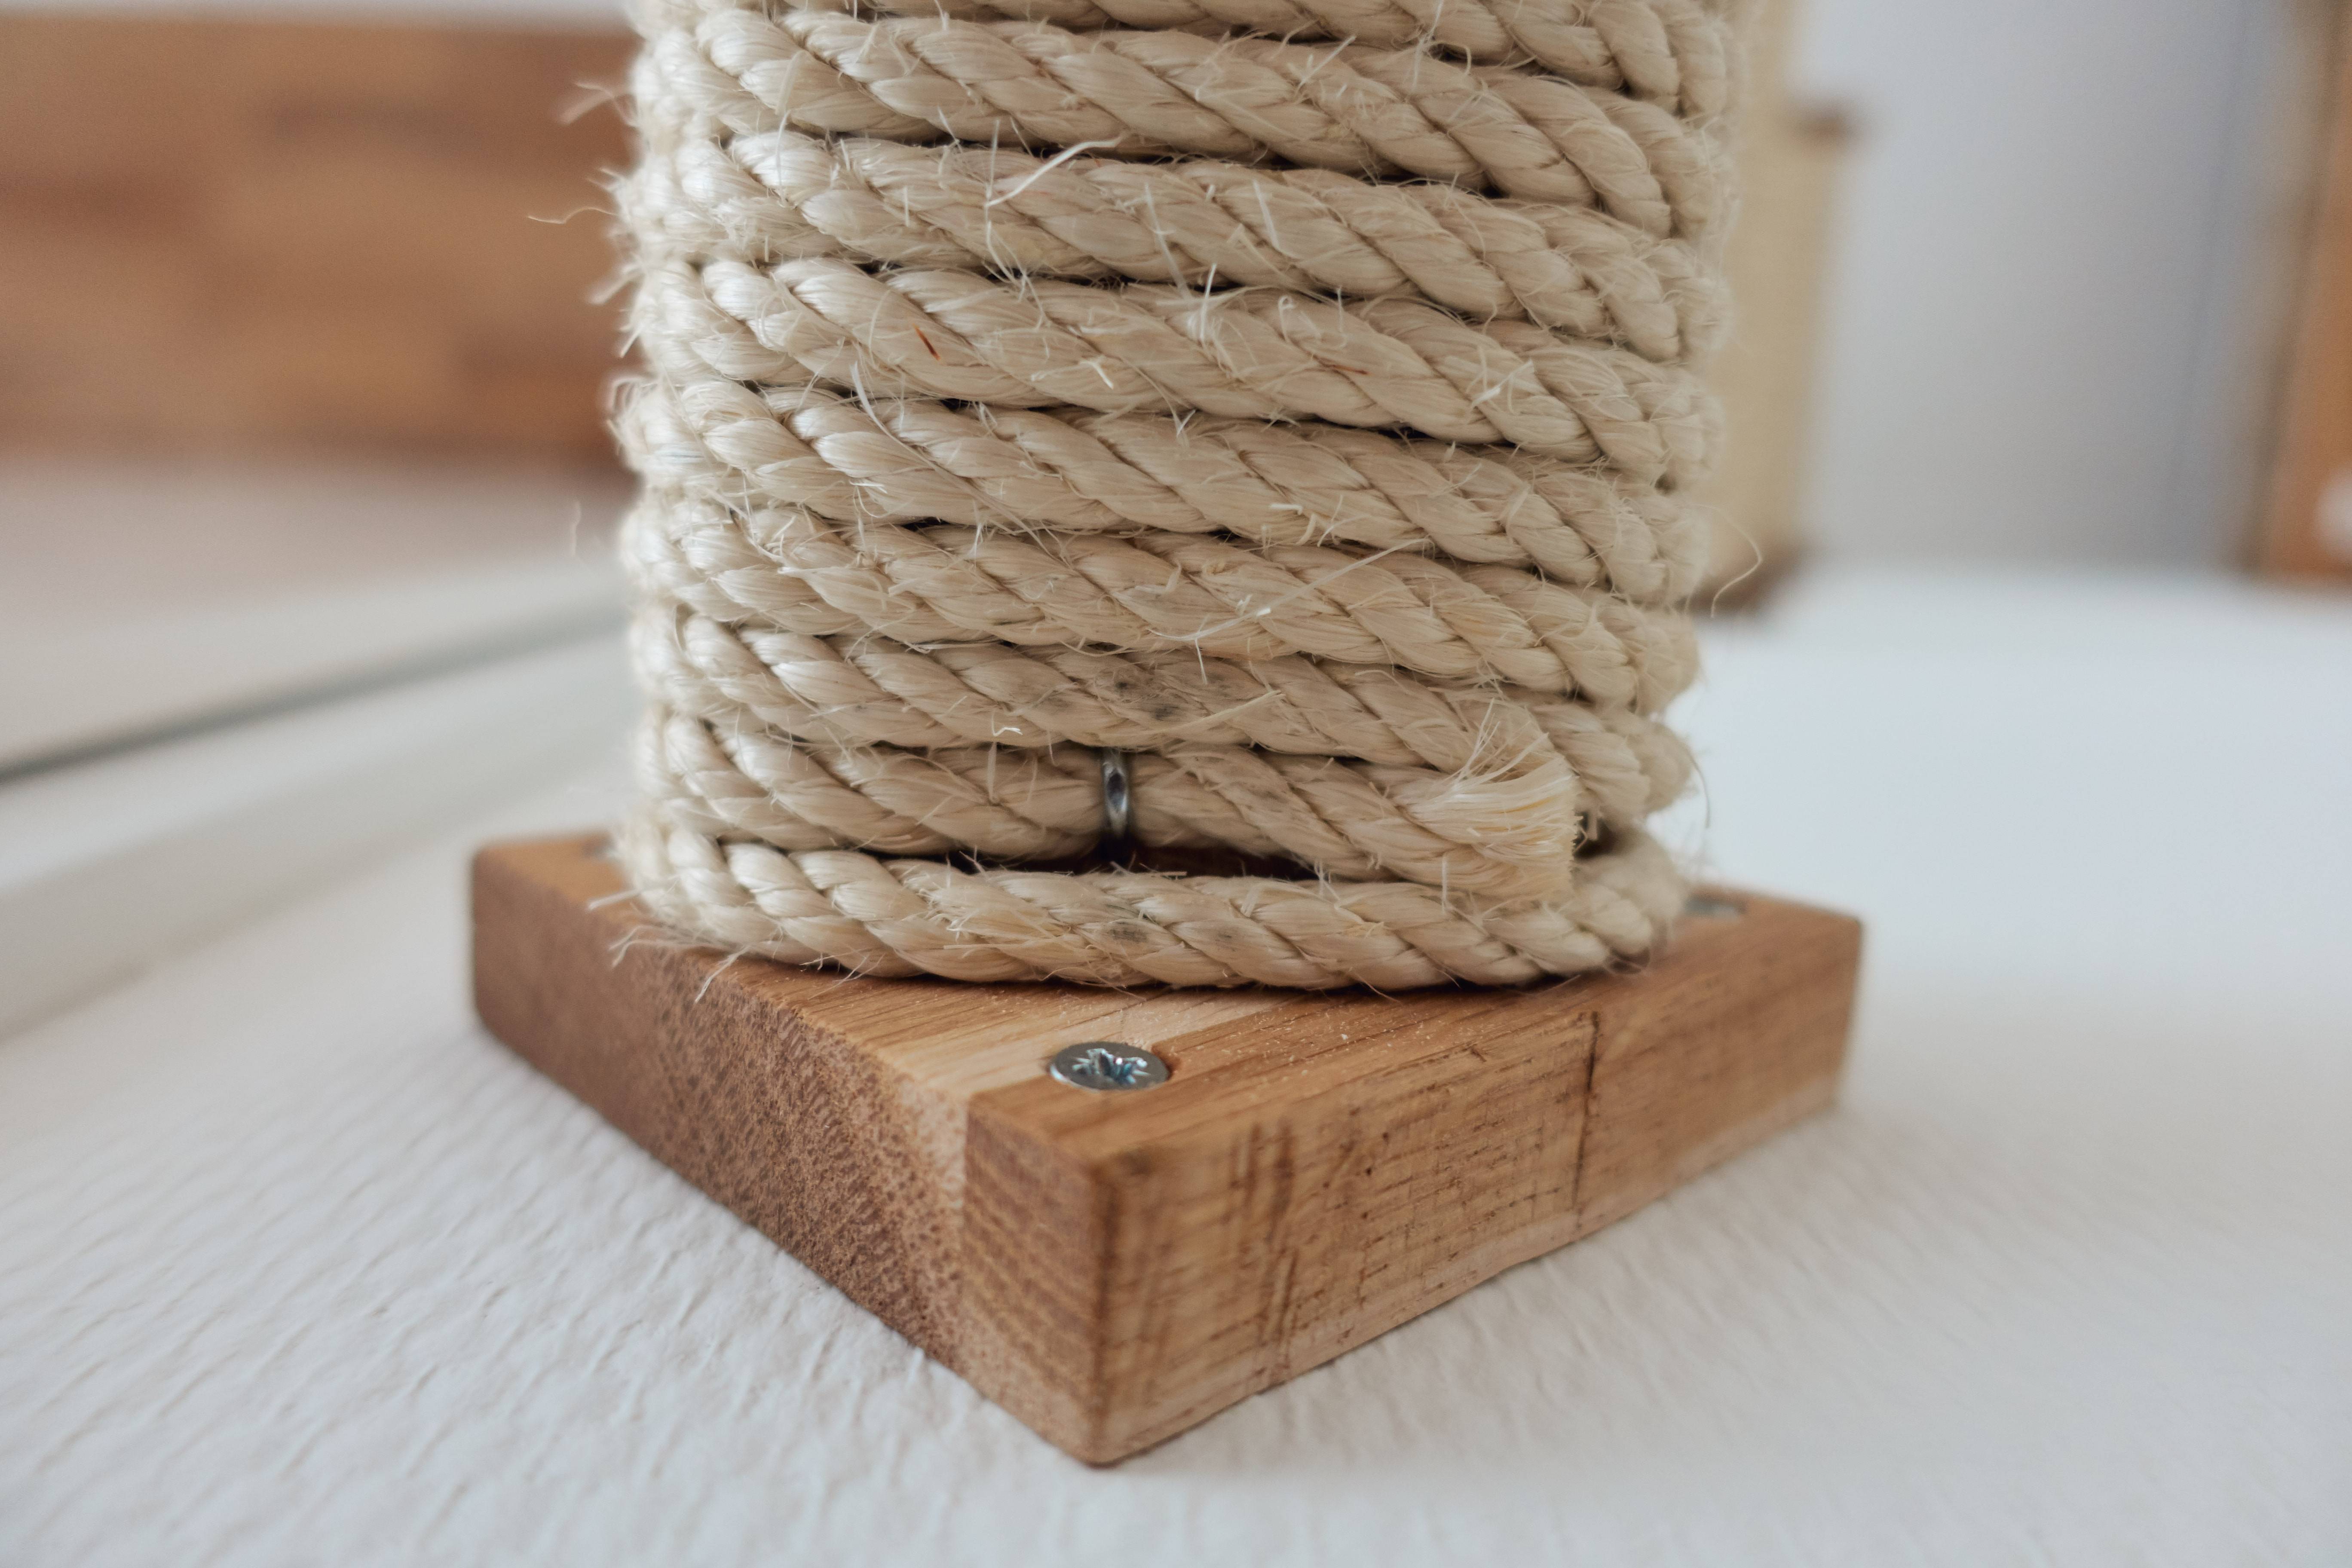
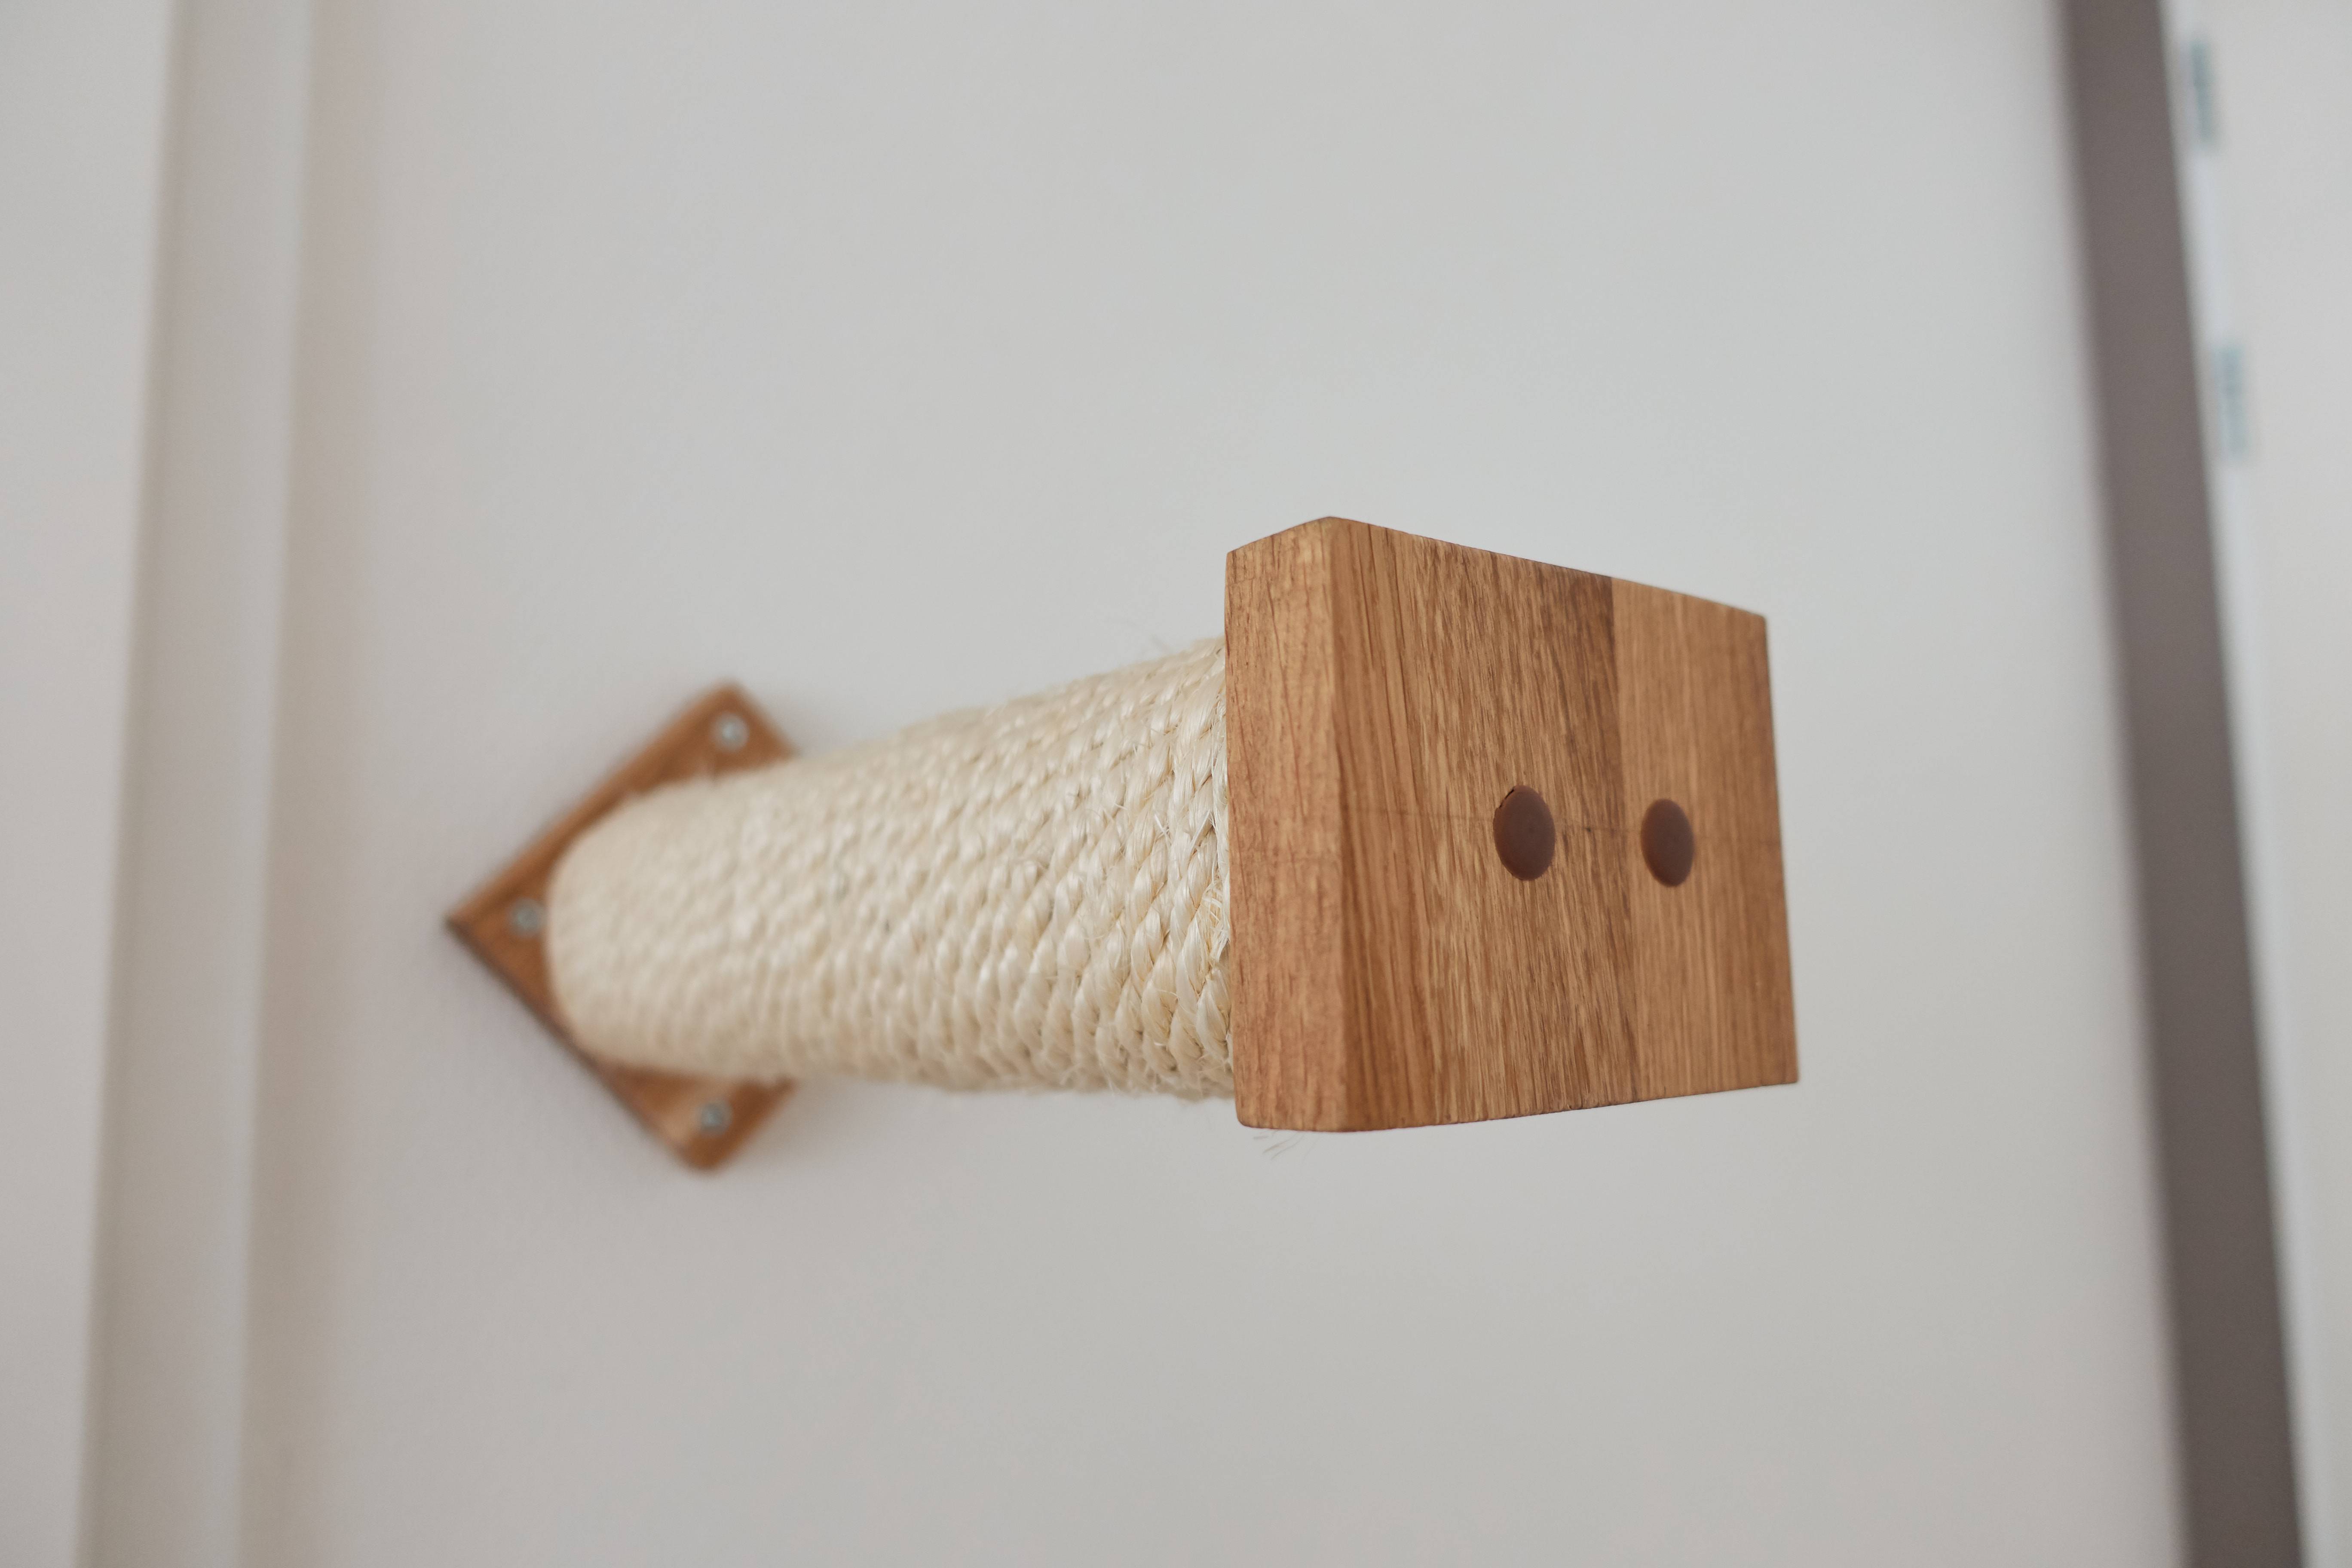
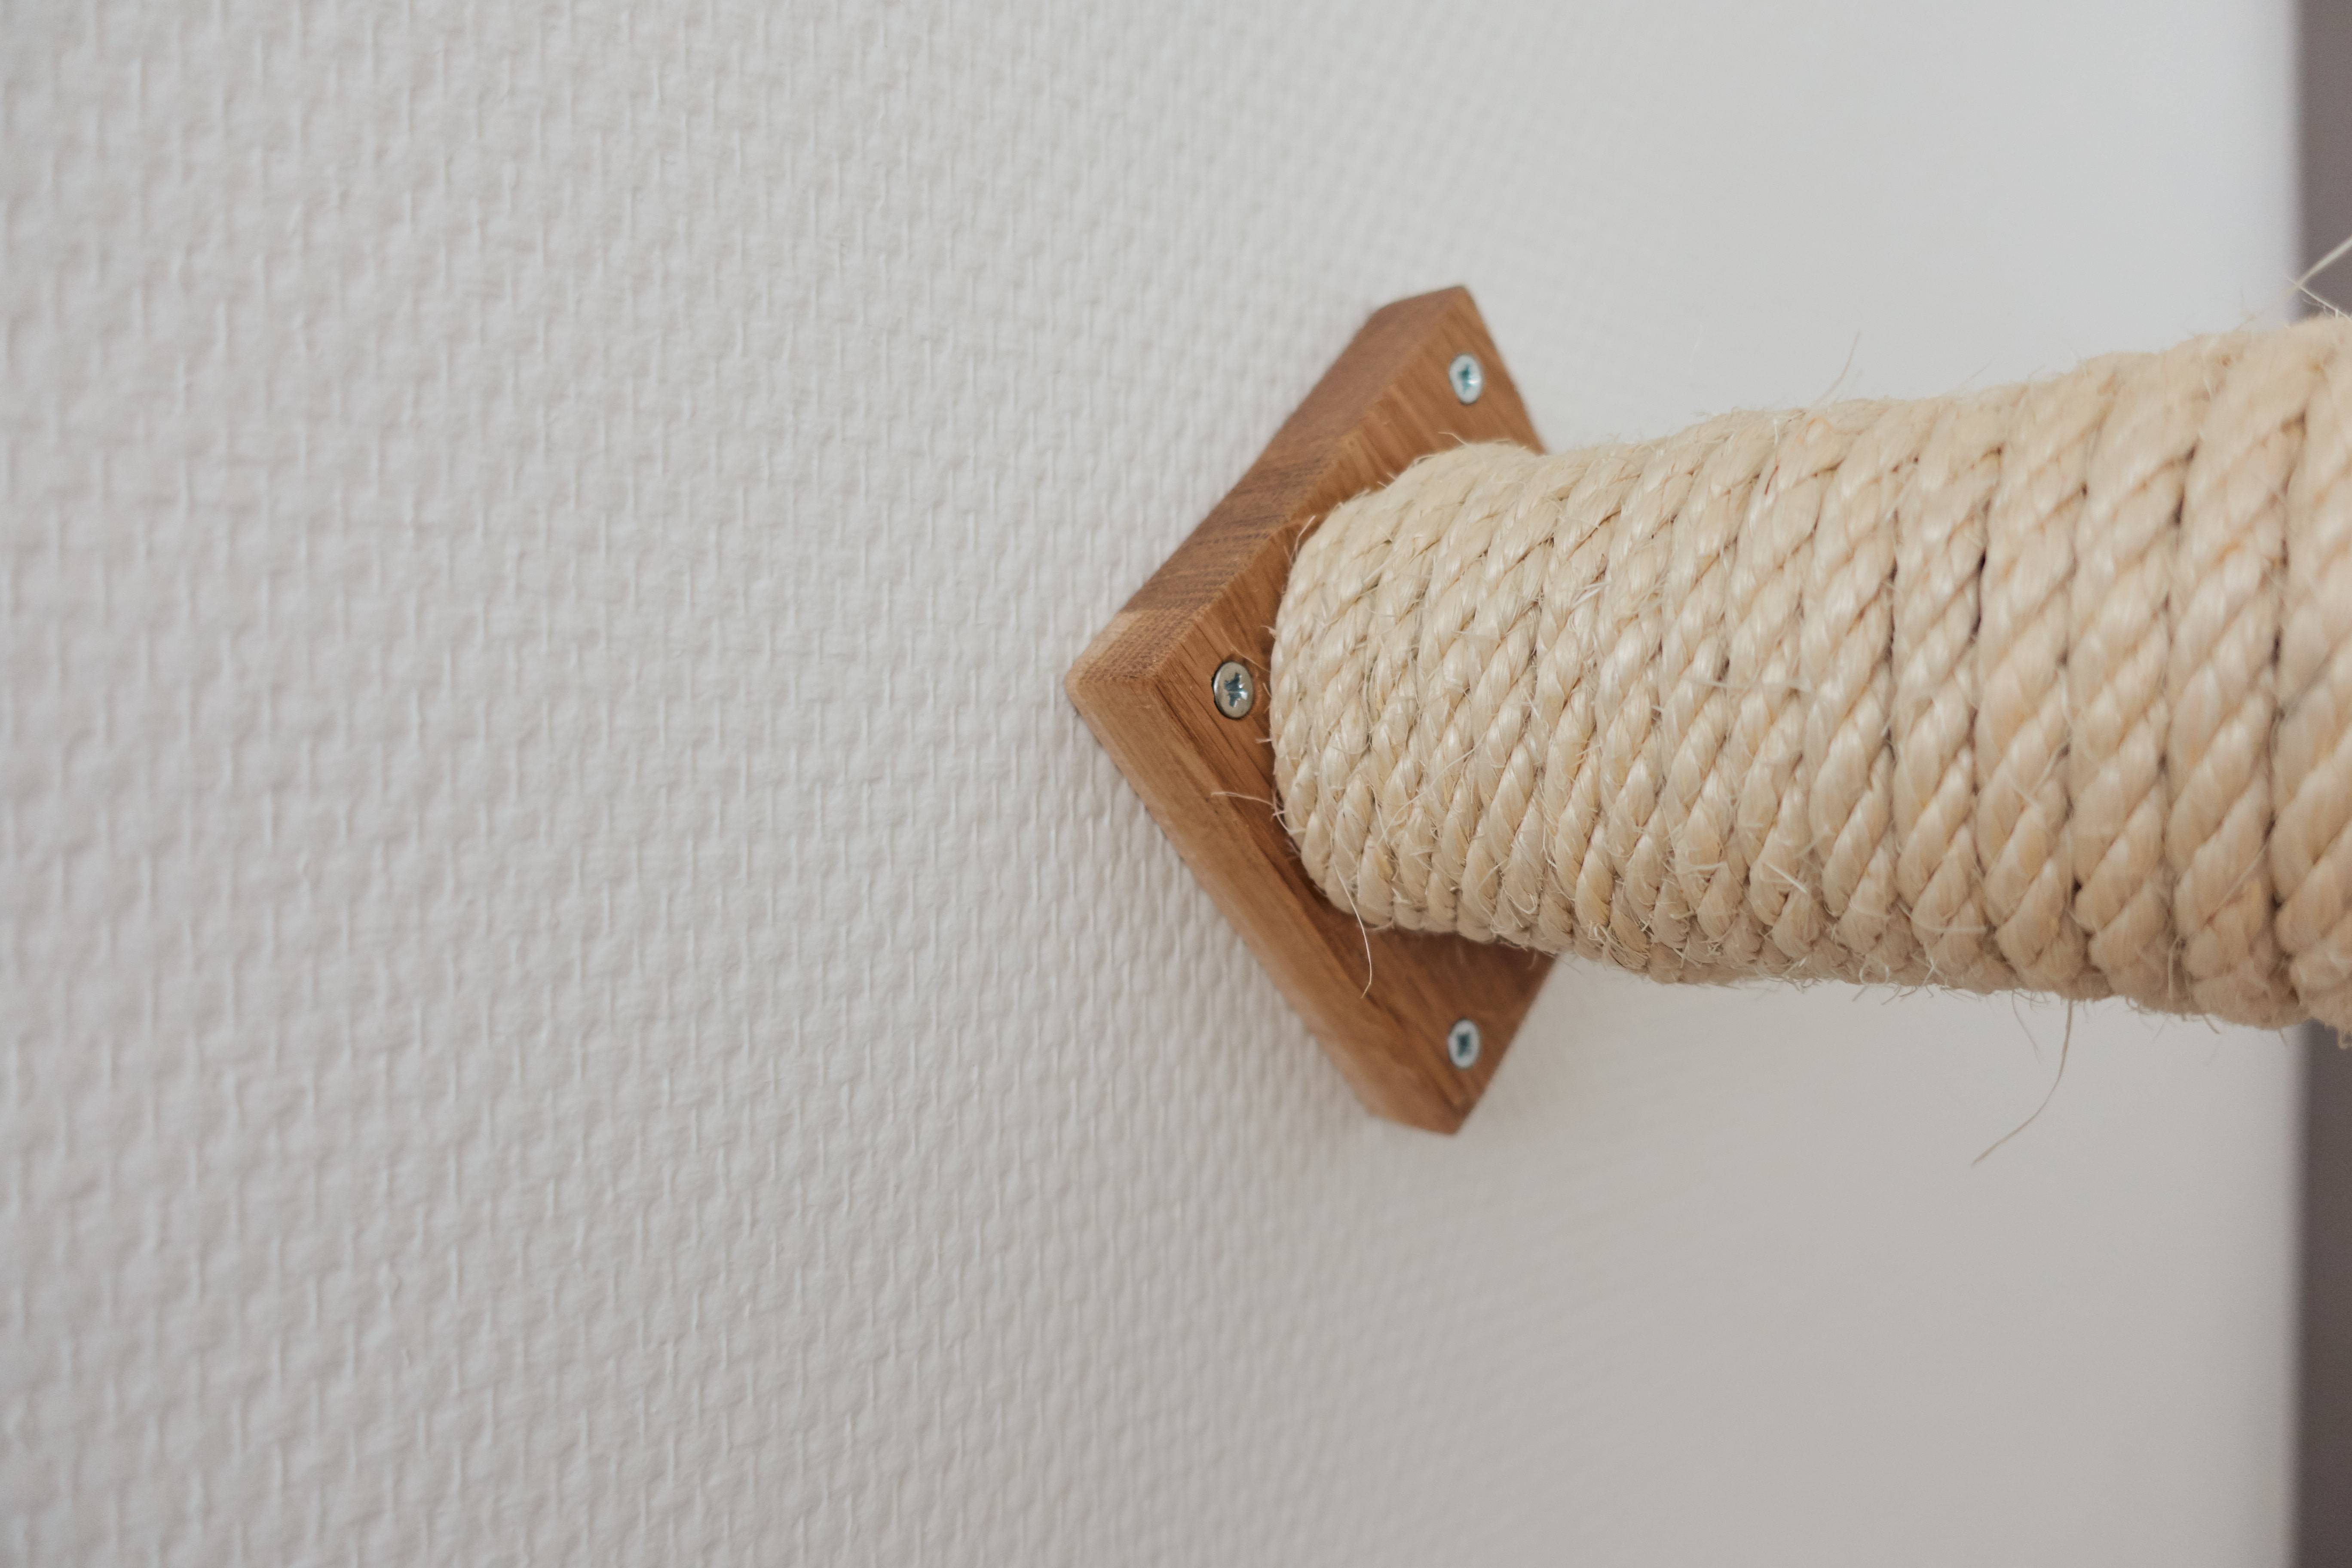
We added four small sisal steps on the wall in between the doors. This gives the climbing wall for cats another way up and down. These are made from 7 x 4 cm spruce wood and every step is 26 cm deep. On the front and back we attached some small oak wood. Including these makes the steps 30 cm deep. The back one, attached to the wall, is 9,5 x 9,5 cm. This one makes room for 4 screws to attach it to the wall. And the front one is 9,5 cm x 6 cm and makes sure the sisal can’t unwind. The sisal itself is attached with a nail at the beginning and ending. To make sure we could insert the nail, the first winding starts a little from the end and crosses in the front to fill the gap. This makes it easier to nail the ending properly. You will see what I mean in the photo below.
This size is enough for quite a big cat to jump and sit on it. The sisal makes sure the cat has enough grip. But to be honest, a few months in, the cats now always choose the lazy way to go up and down. Which means they always go over the shelves and never this way. That might change when they get older. With a special device we tested the steps and were able to put 25kg of weight on one step. So should also hold one or two big boned cats 🙂
Learnings
This climbing wall was finished a few weeks before our cats arrived. When they were here it took them a few days to become comfortable with the wall. They prefer to climb up and down on the left side (see photos below) either on the tall scratching post or via the shelves. After a week we’ve removed the thin white bars on the diagonal shelves as they were slipping too much when going down. We have replaced that with a big piece of sisal. This gives way more grip for them to run up and down and they like running around in circles on that left wall, preferably in a little train all three together 🙂
Photo’s
So these were the photos when we just finished the climbing wall for cats. The cats arrived a few weeks later and used the wall right from the first day. We’ve made some improvements since, which I’ll share in a new article. Because we didn’t really know how and if they would use it, we had a few extra shelves and steps as back-up. If a jump would be to high, we were able to easily add another level. In the end that was not necessary.
What do you think? Does it inspire you to start making your own climbing wall? Or at least start thinking and gathering inspirational images? We are very happy with the result and even our cats use the wall a lot. It’s really a space for them to get some rest, or get out of reach from people that can’t keep their hands to themselves 😀 And if necessary we can always change things or add more components.
Go and read this article if you want to see photos from our cats.

